Emotions Detector with Python


Hello 👋
🤖💻 Excited to share our latest project - an emotion detector program built with Python! 🎉 This program uses machine learning algorithms to analyze facial expressions and determine a person's emotions in real-time. Whether you're a developer looking to add emotion detection to your own project or just curious about the technology, this blog post will take you through the process of building and using the program. So, let's get started! 🚀

What Is OpenCV Python
OpenCV (Open Source Computer Vision) is a library of programming functions mainly aimed at real-time computer vision. It is open-source and cross-platform and has interfaces for C++, Python, and Java. OpenCV-Python is the Python library of OpenCV. It provides a convenient interface to the OpenCV library using Python language. It allows the user to call the functions of the OpenCV library using Python code, which makes it easier to integrate with other Python libraries and frameworks. It can be used for a wide range of tasks such as image processing, feature detection, object detection, and video analysis. Some popular applications of OpenCV-Python include facial recognition, object tracking, and image/video stabilization.
Models that we will use
The program utilizes several machine learning models to analyze facial expressions and determine a person's emotions in real time. The models we will be using are:
Haar Cascade Classifier: This is a pre-trained model that can detect faces in images and video.
Best_model.h5: "best_model.h5" is a file that typically contains the weights and biases of a trained machine learning model. The ".h5" extension stands for "hierarchical data format version 5" and is used to store data in a format that is easy to read and write using the Python programming language. This file is used to save the trained model so that it can be used later on, without the need to retrain the model every time. The name "best_model.h5" suggests that this file contains the best-performing model among the models that have been trained, hence it is likely to be used for predictions in production or further fine-tuning.
File.py
import os
import cv2
import numpy as np
from keras.preprocessing import image
import warnings
warnings.filterwarnings("ignore")
from tensorflow.keras.utils import load_img, img_to_array
from keras.models import  load_model
import matplotlib.pyplot as plt
import numpy as np

# Loading the model
# ps : you can use other existing models
model = load_model("best_model.h5")

# Load the Haar cascade classifier for face detection
face_haar_cascade = cv2.CascadeClassifier(cv2.data.haarcascades + 'haarcascade_frontalface_default.xml')

# Start video capture
cap = cv2.VideoCapture(0)

while True:
    ret, test_img = cap.read()
    font = cv2.FONT_HERSHEY_DUPLEX

    # Branding :) give us a visit
    cv2.putText(test_img, "Visit us : www.Tedora.info", (10, test_img.shape[0] - 10), font, 0.5, (0, 0, 0), 2)
    if not ret:
        continue
    gray_img = cv2.cvtColor(test_img, cv2.COLOR_BGR2RGB)

    # Detect faces in the image
    faces_detected = face_haar_cascade.detectMultiScale(gray_img, 1.32, 5)

    # Draw a rectangle around the detected faces
    for (x, y, w, h) in faces_detected:
        cv2.rectangle(test_img, (x, y), (x + w, y + h), (255, 0, 0), thickness=3)
        roi_gray = gray_img[y:y + w, x:x + h]
        roi_gray = cv2.resize(roi_gray, (224, 224))
        img_pixels = img_to_array(roi_gray)
        img_pixels = np.expand_dims(img_pixels, axis=0)
        img_pixels /= 255

        # Make predictions
        predictions = model.predict(img_pixels)

        max_index = np.argmax(predictions[0])

        emotions = ('angry', 'disgust', 'happy', 'fear', 'sad', 'surprise', 'neutral')
        predicted_emotion = emotions[max_index]

        # Display the predicted emotion on the image
        cv2.putText(test_img, predicted_emotion, (int(x), int(y)), cv2.FONT_HERSHEY_SIMPLEX, 1, (0, 0, 255), 2)

    # Resize the image for display
    resized_img = cv2.resize(test_img, (1000, 700))
    # cv2.setWindowProperty("Facial emotion analysis", cv2.WND_PROP_AUTOSIZE, cv2.WINDOW_NORMAL)
    # cv2.setWindowProperty("Facial emotion analysis", cv2.WND_PROP_FULLSCREEN, cv2.WINDOW_NORMAL)
    cv2.imshow('Facial emotion analysis ', resized_img)

    # Exit the loop if the 'q' key is pressed
    if cv2.waitKey(10) == ord('q') or cv2.waitKey(30) == 27:
        break

# Release the video capture and close the window
cap.release()
cv2.destroyAllWindows
Results
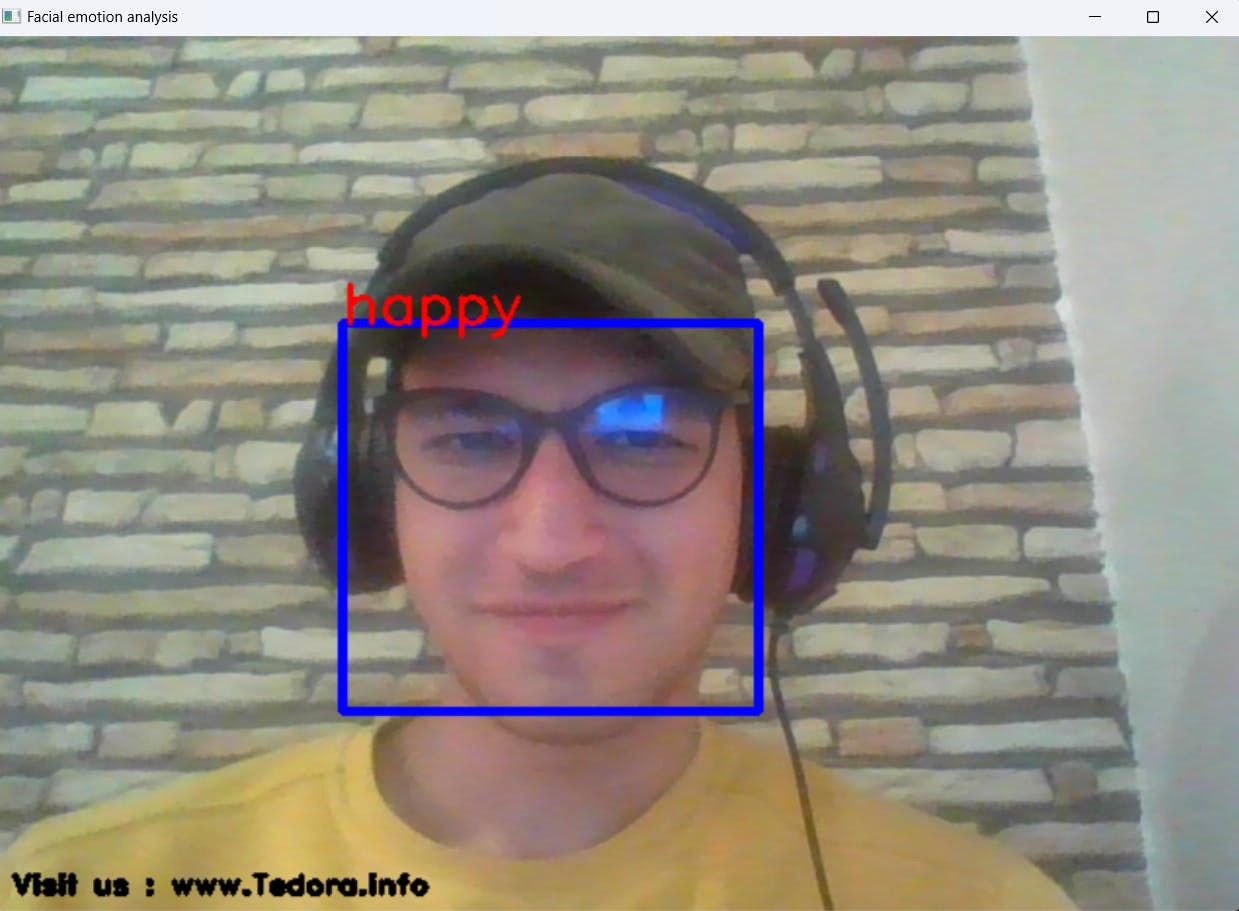

You've reached the end of the article! 🎉
In conclusion, this code snippet demonstrates how to use various libraries to create an emotion detector program in Python. By importing libraries such as OpenCV, Keras, TensorFlow, and Numpy, we can easily load and preprocess images, load a pre-trained model, and display the results.
We hope that you found this blog post informative and that it provided you with a better understanding of how to use these libraries to build an emotion detector program.
If you have any further questions or would like to learn more about this topic, please visit us at tedora.info.
Once again, thank you for reading and we hope to see you soon at tedora.info!
Sure! If you're interested in checking out the code for this emotion detector program, you can find it on our GitHub repository at this link: Github Link